The Blackbird® cloud video editor is actually quite simple at first view with much the same parts as any other NLE. The interface layout is flexible and customisable, with greater depth of features than at first sight.
Beside the toolbar you will typically see: a player panel; a recorder panel; a files panel; and a sequence panel. The player panel and recorder panel are both video viewers and work similarly.

Cyan and orange Like most digitally-based non-linear video editors, there is the concept of incoming video and audio source media clips, and also outgoing edited productions. Historically, a tape edit suite would consist of two decks, one of which only needed to be a player, the other a recorder. Throughout Blackbird where there are editing capabilities, there is a colour coding system in place:
When you see cyan and orange tabs and icons, remembering that cyan is input/player and orange is output/recorder will help orient yourself within the user interfaces. An easy mnemonic method of remembering which: orange is a bit reddish, and only the recorder deck would have a Record button, which traditionally is coloured red. Also, a studio “ON AIR” light to indicate recording is red or orange. |


Player panels (for playing and recording)
Each has a space for video display; a set of transport controls; time indicators; and an ingenious strip display underneath the video called the “Video Waveform”.
There are play panels, and a record panel – more than one play panel may be opened. If a clip is already in view on the play panel, a Secondary-click (or Option+click/Alt+click) on another clip from the files panel will “stack” the second clip directly on top of the previous. Both clips will bear a small cyan coloured “tab” protruding to the left of the panel, enabling selection by bringing that pane to the front. If you keep on Secondary-click (or Option+click/Alt+click) further clips, they will continue to stack. The tabs are grabbable enabling you to reposition these individual play panels, away from the stack arrangement. |
By dropping a folder of video media onto the visible play panel, each clip in the folder will reside in one single play panel – seamlessly, one after the other. They still are in fact separate clips, the play panel will play the sequence as if one larger clip. This is often quite useful from a handling point of view. When you drop the folder onto the play panel, you are asked a question relating to the order they will appear. You have a choice of having the sequence sorted by date, sorted alphabetically or by autosync. |
Video Waveform
The Video Waveform is a navigation device, allowing you to shuttle forwards and backwards, scrub, or jump to new locations simply by clicking to the left or right of the centre (centre representing the “now” which is playing now). The Video Waveform itself is zoomable, to allow the whole clip to be seen in one go, or to zoom in to detail. The Video Waveform signal image — both video and audio — shows “energy” or “activity” throughout the time span shown.

green areas of the bar represent available Blackbird proxy media – this starts filling immediately either side of the cursor, followed by rapidly filling the remainder
orange areas are currently fetching proxy media – these become populated by green in a short space of time
scrollable thumb enables very rapid navigation back and forth through the entire clip
video waveform preview – if you zoom in, you will see a representational shaving from each frame, zoomed out presents a holistic view of the entire clip, enabling you to ascertain movement, events or scene shifting
the “here and now” – a static cursor representing the position within the video source you are viewing in the player
an edit or cut (this illustration shows the recorder, whereas the player would normally show unedited source clips – however, if any of those source clips are actually captures of an already edited or cut piece, you will see any jump cuts in a similar fashion).
audio is represented similarly by energy (the lighter the higher the sound level, the darker the closer to silence) – this makes it particularly easy to visually aim for gaps in dialogue, for example
zoom button (the mousewheel also performs zoom in/out, if you have one on a connected mouse)
The Video Waveform is freely zoomable from the entire duration of the video clip or edit fitting into the area, all the way in to seeing individual frames.
The idea of the Video Waveform is that successively narrower slices of the video frames are packed together in varying density according to zoom view. When the Video Waveform is zoomed all the way out, you see strata formed from colours present within an aggregate of each frame – very much like when you’re digging for dinosaur bones around the Cretaceous-Paleogene Boundary, except sideways.


This presents an impressionistic view of the nature of what is occurring dynamically in the video itself. Soporific and static shots would all look more or less the same for a significant duration. When action occurs, or something changes, or even the scene shifts, this will “paint” a noticeably different pattern – the dynamics represented visually will correlate to alterations in the visual content. The result is that navigation is eased considerably while retaining great accuracy (compared with most other NLE software on the market).
Below this is the current time or timecode display. Below that are “in” and “out” time points, defined by clicking appropriate buttons Set In point and Set Out point .

“rewind” navigation | time and positions | “forward” navigation |
1: go to the start of the video 2: go back to the previous edit point 3: step back one frame | 4: set “in” point 5: timecode (current position in time) 6: duration of selection (between “in” and “out” points) 7: set “out” point | 8: step ahead one frame 9: go ahead to the next edit point 10: go to the end of the video |
The top bar of each of the Player and Recorder panels have three buttons on the right hand side of each.
The Player has:
Audio volume control
Make video image bigger (or with Secondary-click (or Option+click/Alt+click), smaller) in network-suitable sizes
Although this looks like a rubbish bin, it simply removes the image from your view (as opposed to deleting – don’t worry, your clip is still where it was)
The Recorder has:
Save current edit as a new clip (actually a new EDL, playable immediately to any other Blackbird user in your production team elsewhere without having to “render out” a video file of it!)
Make video image bigger (or with Secondary-click, smaller) in network-suitable sizes
Although this looks like a rubbish bin, it simply removes the image from your view (as opposed to deleting – although if you wish to save your current production edit use the Save button first.)
File viewing panel
The files panel is a directory view of the files of your project. This differs somewhat from the files and folders in your computer – all these files are in the Blackbird cloud. In most respects these files viewing panels behave much like your computer OS file windows, with additional features.

breadcrumbs
search
folders and files
Unlike files on your computer, which are either there or not, assets on the Blackbird cloud are often in varying states which you would normally benefit from being aware of. An example is when an open-ended file such as an HLS stream is accepted – it is useful to see that it exists and has begun, but is still “in progress” and is not yet final. This is easily ascertained by the coloured strip, both as a measure of progress (by how far across it is) and status (which colour it is). |
The root file panel allows browsing of files and folders shown as thumbnail, or listed by sortable columns. Double-clicking on a folder will replace the parent. There is a “breadcrumb” feature which shows how deep you are inside folders and which parent folder you just came from – this makes it easy to find your way back out!
If you Secondary-click (or Option+click/Alt+click) a folder, it opens a new file browser panel but leaves the original behind it. Multiple file browser panels can be open at the same time. The panels remember where and which size they were used to be when previously opened.
Within a file browser panel, double-clicking a source clip opens it in a (cyan) player panel. A Secondary-click will also open in a player panel, but this will be a new one, sitting exactly on top of the previous one. You can tell this, because both will have cyan “tabs” sticking out of the panel left edge.

These tabs are clickable to bring any of the players to the fore of the stack. This is useful for organising your workspace. On the other hand if you want work in a mess, or perhaps prefer to see several simultaneous clips for comparison, you can move each player panel away to wherever you want it to sit. If you happen to have a multiple-monitor setup on the computer you are using, you can drag the panels across to other monitors.
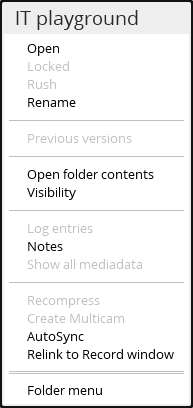 A Secondary-click (or Option+click/Alt+click) on a folder shows a contextual menu from which you can open, but also: rename; affect visibility; add notes; autosync the contents (see Advanced techniques) and relink the contents to the record window The “Open folder contents” menu item opens a folder full of clips into the viewer, and also onto a single timeline at once. This can also be achieved by dragging the folder onto a player window (where it may be sorted by date, alphanumeric or autosync). The “Visibility” menu item defines the user roles which can see the asset. This is useful for ringfencing, and preventing confusion with similar assets of other episodes or segments that may be in production by your organisation at the same time. |
The sequence panel
The sequence panel will usually initially show a timeline view. Exceptions to this are when the account holder has been set up only to perform logging or reviewing (in which case they see the logging view).
Timelines on the sequence panel
The timeline view at first sight resembles most other industry-standard editors, in that there are “tracks” stacked on top of each other (video topmost, audio underneath them). The time runs from left to right. Edits, cuts and transitions are easily visible.
Example of sequence panel switched to edit (a.k.a. timeline) view, and source (cyan).

Name and duration of clip
Show sync – shows a unified white outline around assets that are in sync
Zoom button zooms in and with Secondary-click out again – your mouse scrollwheel also performs this zoom action
Undo button
Mode select button Mode select for the whole sequence panel (see note immediately below)
Click to disable/enable tracks on the timeline – shown here are one video track, two audio tracks
Visibility button Click to disable/enable visibility of specific tracks in the viewers
Video track button A video track
Audio track button Two audio tracks
The cursor representing the “play head” currently displaying in the player
The following panel pops up to allow mode selection (see No. 5 above). 
|
The visual content along each track shows how much “activity” or “energy” is occurring at any given time, so that it is quite easy to recognise a position and pinpoint it purely by visual recognition of how “busy” (or not), a track appears to be along the timeline. This applies equally to audio tracks, too. It becomes intuitively simple to pick quiet passages for cutting without interrupting a spoken word or ambient sound (for example, in a J-cut or L-cut).
Empty sequence panel switched to edit (a.k.a. timeline) view, and record (orange).

Name of sequence (here Untitled, as it is empty and unsaved)
Video track(s) – here shown empty
Audio tracks – four empty audio tracks shown here
Title track
Add tracks (including quick video and audio buttons)
Show sync relationship (by white outlining a group)
Cut – creates cut edit (all active tracks) at the current point
Transition – creates transition between video layers of two clips
Gap – add a gap or filler (duration relative to zoom level)
Sync lock/unlock – unlock/lock audio from video, video ~ video, audio ~ audio, etc.
Zoom in/out – click to zoom in, Secondary-click (or Option+click/Alt+click) to zoom out, alternatively if you have one, use your mousewheel over the timeline
Undo (Secondary-click to re-do)
Sequence panel view mode changing button (change cyan / orange, and change Story / Log / Edit , see note above)
Sliding ruler for navigating to absolute position
Current position cursor (the “play head”)
Resize corner handle
Sequence panel switched to storyboard view, source clip (cyan).

Some log entries represented as thumbnails and their corresponding text descriptions
Name and duration of source clip
Search field for searching among the log metadata
Options button for alternative search modes
Undo (Secondary-click to re-do)
Change sequence panel view mode from storyboard/cyan mode
Sequence panel switched to edit (a.k.a. timeline) view, source clip (cyan).

Name and duration of source clip
Video track
Audio tracks – two audio tracks shown here, typical for a stereo audio signal
Add tracks (including quick video and audio buttons)
Sliding ruler for navigating to absolute position
Show sync relationship (by white outlining a group)
“Video Waveform” display, showing a time-representation of the content of a video clip, and two audio clips, sync-locked (denoted by white outline)
Skeleton view of the timeline, with only sections and edits shown as wireframe lines
Zoom in/out – click to zoom in, Secondary-click (or Option+click/Alt+click) to zoom out, alternatively if you have one, use your mousewheel over the timeline
Current position cursor (the “play head”)
Cyan line denoting position of an in or out point of a log entry
Undo (Secondary-click to re-do)
Change sequence panel view mode from edit/cyan mode
Sequence panel switched to edit (a.k.a. timeline) view, and record (orange).

Name and duration of production edit
Video track (one in this case, other video tracks may be added or removed)
Audio tracks (four in this case, other audio tracks may be added or removed)
Title track, providing burned-in subtitling on any published video
Add tracks (including quick video and audio buttons)
Sync lock/unlock – unlock/lock audio from video, video ~ video, audio ~ audio, etc.
Tracks with no content on at the present time
Show sync relationship (by white outlining a group)
Sliding ruler for navigating to absolute position
Cut between one clip and a consequent clip – a jump cut is the simplest form of edit
Current position cursor (the “play head”)
Lock/unlock relationship of tracks to allow audio and video to slip apart
Skeleton view of the timeline, with only sections and edits shown as wireframe lines
Undo (Secondary-click to re-do)
Change sequence panel view mode from edit/orange mode
The same mode as above, but in this case you see storyboard information too.

Tracks – one video and two audio in this instance
Matrix of all available tracks on enabling buttons beside their visibility buttons
Storyboard track enable and visibility buttons
Video track (one in this case, other video tracks may be added or removed)
Audio tracks (four in this case, other audio tracks may be added or removed)
Title track, providing burned-in subtitling on any published video
Add tracks (including quick video and audio buttons)
Skeleton view of the timeline, with only sections and edits shown as wireframe lines
Sliding ruler for navigating to absolute position
Current position cursor (the “play head”)
Pictorial thumbnail of a storyboard segment
Textual thumbnail of the same storyboard segment
Change sequence panel view mode from edit/orange mode
Sequence panel switched to storyboard view, and record (orange).

Storyboard segments denoting the order of appearance
Name and duration of production edit
Search field for searching among the log metadata
Options button for alternative search modes
Undo (Secondary-click to re-do)
Change sequence panel view mode from story/orange mode
Although usually referred to as the “timeline panel”, the sequence panel may perhaps not be showing a timeline at any given moment because the logging or storyboard view may be selected instead. For normal editing users, the timeline view is the one first seen by default. |
The tool panel
The vertical strip of buttons along the left edge panel — the toolbar — is actually divided into three areas. The top and bottom are static, whereas the centre section has a variable amount and choice of buttons according to the account in use. When it becomes full it is scrollable (for example, using the mousewheel, or the scrollbar).
The buttons themselves have the following functions (click the topmost right-facing double-chevron ![]() to see a panel showing button names in actual words).
to see a panel showing button names in actual words).
- Files
click to open the root folder in a file viewer panel. The file viewer panels simulate what you see inside a conventional computer OS folder, only because these files and folders are actually on the cloud, and specialised to production media, they can helpfully indicate pertinent information. click to alternate between the top level view of files, or any deeper level you were at. Secondary-click to go up to level you were previously viewing. Also, you can drop an item on the files icon to save it.
- Upload
Presents an upload panel in a browser tab, with ingest format settings, a Choose files button and a Upload file button.
- Recycle
click to see a folder view of all the items manually deleted, allowing you to drag items out again should you wish. It is also possible to drop a file or item onto the Recycle button to delete it.
- Recovery
Much like the Recycle bin, this shows autosaved files.
- Tasks
This button shows a to-do list into which tasks may be entered by the users in your workgroup on this project or production. On many projects or accounts, this is not enabled by default.
| Here in the centre will be the (scrollable, if necessary) centre section of buttons for publishing destinations. These are described in the later chapter “Publishing”, as there is no standard set of publishing buttons, each account will set their own up on a contingency basis. |
- Shortcuts
Also known as the keyboard expansions button, and when you Secondary-click it shows keyboard shortcuts. The difference is that keyboard expansions are a kind of “macro” whereby if you type a short already-chosen character string Blackbird will expand it out to an already-chosen phrase. The function keys (F1 — F12 if you have those along the top row of your keyboard) can each be pre-set to emit a phrase of your choosing, or the typing of any short group of letters on the keyboard can be “trapped” to convert to a phrase of your choosing.
- Settings
Saves and retrieves the layout of the panels.
- Analytics
Not normally visible on most users toolbar. If it is visible, it opens a browser tab showing statistics of times of usage, etc.
- Help
This.
- Chat
Opens a chat window which works within the Blackbird system, providing “public”; “private” and “support” reach. “Public” is rarely used, it broadcasts to every user of Blackbird as you see by the list on the right side! “Private” communicates within your project or account group. “Support” comes into the constantly-monitored Blackbird support here at Blackbird plc.
| Each account may or may not show some of the items represented in these pictures, contingent upon the access level and role of the user. |
Editing a simple sequence
You can directly “grab” the video picture area and drag it (turning it into a ghosted thumbnail with track information boxes) moving toward the Sequence Timeline panel to drop it there. Shown here, you can also directly grab the duration (the number below the timecode display and between the two arrows) and achieve the same result.

To make a conventional “assembly” type of edit from a sequence of several clips, first set your Sequence panel view selection from cyan / Edit, if it was on cyan (it would be if you had only got as far as viewing your first clip in a source clip viewer) and change it to orange / Edit, as shown here. The button to change this view selection is the word in the top right corner (either Story; Log or Edit) shown in either cyan or orange.
Drag the clip, as detailed above, onto your orange Sequence Timeline view. Notice that the ghosted thumbnail grows some small connecting lines to a skeleton wireframe positioned where the drop target will be were you to let go now. If you keep moving the ghosted thumbnail, the skeleton wireframe also keeps moving, showing the updated position of the drop target for the video and audio tracks it comprises.
Flexible drop targets for video and audio tracks
In this instance, which is based on the default settings, the Sequence Timeline panel still has the default provision for four audio tracks at this time (more can be added, or taken away).

Be aware that as you drag the clip across the Timeline display and you move vertically up or down, you can influence where the audio tracks will land – here you see it will place the dropped clip with audio on tracks 2 and 3, not 1 and 2 as the previous example.
Similarly, this view shows the audio from a dropped clip passing even lower down being placed on audio tracks 3 and 4. This may be what you intend – if you wish to run audio from one clip across the duration of another video clip, either by mixing or substitution. A J-cut or L-cut, for example, are both common editing techniques which dissociate the audio transition from the video transition, to good effect. Also, if you add more video tracks, the same drop placement technique will also allow you to aim toward different video track targets to build an edit with more complex video juxtapositioning.
Creating a sequence of three clips, repositioning one of them
As a further simple example, the following animation depicts the above example of one placed clip on the orange edit Timeline view of the Sequence panel, and shows further clip placement.
A second clip (the white blossom focus-pull shot) is selected in the File viewer panel, double-clicked to show in the clip player panel. We had already previously chosen the “in” and “out” points of the clip, giving us a duration of 07:05, which we then drag onto the Sequence Timeline panel, just past the first clip we placed in the previous example.
You can see that at first it tries to snap to the position before the first placed clip but if we keep moving past that it will then try to snap to the position after – we drop the clip there. This gives us two clips, one after the other with a simple cut between them.
We go to the File viewer panel again and select a third clip of green plant shoots in Spring (again, prepared previously for appropriate “in” and “out” times – here we see a duration of 05:19) and we drag that duration to the Sequence Timeline panel and drop it. However, we notice that we dropped it between the first and second clip! We grab the clip in the timeline and move it over to become the final clip in our three-cut sequence, where it snaps into place, and effectively swaps position with the second-placed clip.
Also notice that there is a skeleton wireframe display below all of the tracks (in the form of an enlongated thin set of white rectangle outlines, each lining up with the timing of the track display clips). This skeleton display is a handy sync guide, showing the overall population of the timeline, whether there are any gaps, and what the relationship of the overall audio and overall video output will be (in such cases where the audio and video have separate cuts).
Finally, we save our edit as a new EDL, which will play the edit again in future exactly as we have created it. We save it with the icon in the top right corner of the orange recorder panel (in this example shown, the video player on the right side is the Recorder, with the orange scrolling thumb, but of course any of these panels could have been placed anywhere you prefer).
The new saved edit appears in the File viewer panel waiting for you to type in a new name. Here we have simply named it “threeClipSeq”, although a more meaningful name relating to the production or subject matter would be typical.
Adjusting edit points
The Sequence panel’s Timeline views (for both cyan and orange) have a row of buttons along the top for creating a cut edit point; adding a gap / filler; or adding a transition.
However, the cursor itself will change to allow you to fine-tune the positioning of an existing cut. The cursor as it nears a cut on the active timeline will change:
The  double-sided trim tool adjusts the cut position of a consecutive pair of clips without changing the overall length of the pair in the timeline.

The  left trim tool adjusts the “in” point (the left edge) of one clip. Moving an “in” point to lengthen a clip will push all subsequent clips synced on the track further along the timeline, lengthening the total duration of your production edit. Moving the “in” point to shorten a clip will similarly reduce the total duration, all subsequent clips will shift nearer to the beginning of the timeline.

The  right trim tool adjusts the “out” point (the right edge) of one clip. Moving an “out” point to lengthen a clip will push all subsequent clips synced on the track further along the timeline, lengthening the total duration of your production edit. Moving the “out” point to shorten a clip will similarly reduce the total duration, all subsequent clips will shift nearer to the beginning of the timeline.

 There is also an active timeline fade tool (denoted by the appearance of a large cross symbol). This is found by clicking in the top corner of a clip. By dragging horizontally into a clip on a track, you produce a fade (of video, audio or even a subtitle track), shown by a diagonal darkening of the end (or start) of the applied clip.

These tools allow considerable fine adjustment on the fly, and are always available merely by bringing your mouse cursor close to a cut or an edge. When combined with the sync lock/unlock and sync display buttons, edits to video and audio may be made independently.