The process of logging is intended to derive and add knowledge about media such as video clips or streams, and not to actually alter them in any other way. This created information is added in the form of metadata – additional data about the content already in the file, consequently placed within or accompanying said media file. A logger (person doing the logging work) will open the Blackbird player or editor in a view which shows a media player panel, and in the sequence panel, the logging view instead of a timeline view.
To switch the sequence panel to logging view from either timeline or storyboard view, the Sequence panel mode select button at the top-right corner of the sequence panel shows different views to select: cyan – Storyboard; Logging; Edit (timeline), and orange – Storyboard; Logging; Edit (timeline). You can also just click that button to quickly switch between timeline and logging views. 
|
The logging view of the sequence panel is a downward-progressing list, with columns, like a spreadsheet (only more interesting). The top left corner identifies the clip by name, and shows the clip duration. This top section can be grabbed to drag the entire sequence panel to a desired position. The bottom right corner (cyan or orange halftone triangle) allows panel resizing.
Sequence panel switched to log view, source clip (cyan).

Name and duration of source clip
Some log entries (in + out times and description)
Text field in which to type/edit description text for a new log entry (similar edit fields appear if you click under in; out; sync columns)
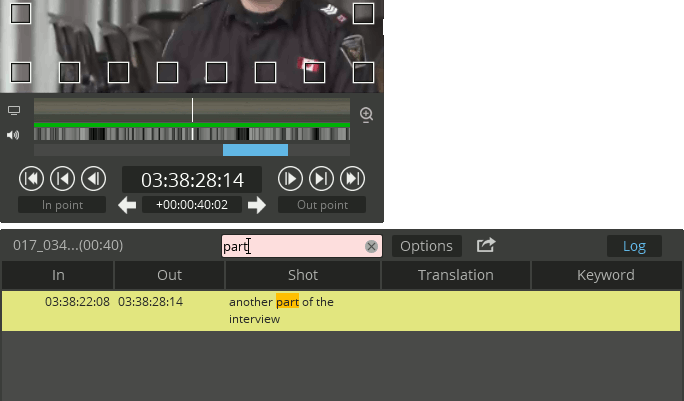
Search field for searching among the log metadata
Options button for alternative search modes
Export log as a .cvs table in a new web page, ready to print or save
Change sequence panel view mode from log/cyan mode
Sequence panel switched to log view, and record (orange).

Name and duration of production edit
Search field for searching among the log metadata
Options button for alternative search modes
Export log as a .cvs table in a new web page, ready to print or save
Some log entries (in + out times and description)
Undo (Secondary-click to re-do)
Change sequence panel view mode from log/orange mode
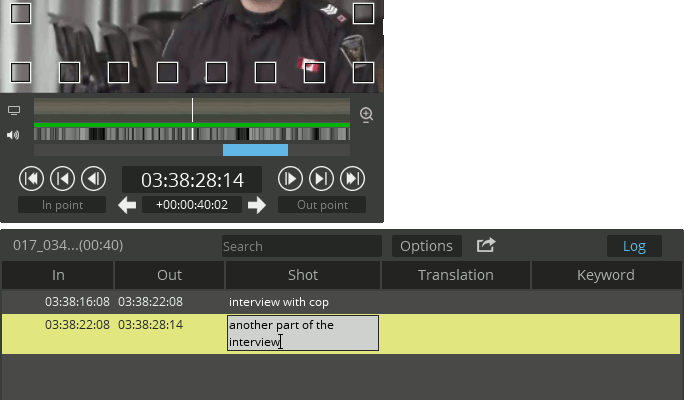
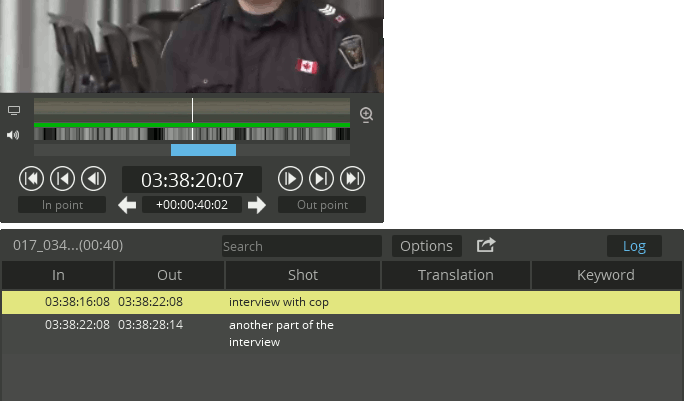
Each added log entry will add a row to the list. The columns express the “in” and “out” points of the log entry (pertaining usually to the source clip’s timing, in the cyan side). The entry may be named in the “shot” column, for ease of identification later. A “translation” column is useful for multi-lingual environments. The final column — “keyword” — is for adding keywords pertaining to that shot, which will help to group shots later because they share pertinent keywords.
These are the default columns in the view, an account manager may alter the columns available in a specific user or role’s view. Also, a Secondary-click (or Option+click/Alt+click) on any column header will list the names of columns which may become visible or hidden, a further Secondary-click allows multiple selections within that list. Column boundaries in the header may be dragged to adjust widths, and whole columns may be re-ordered by dragging them across to a new position. Sorting the information is possible on any column, and either direction (up, down) by clicking on the desired column header – an arrowhead-like character will appear beside the column name, indicating sorting and direction. A search feature allows searching within the metadata columns. An “export” icon sends the metadata to a separate browser page for you to print out, should you wish. Finally, an Options button shows a menu to adjust how metadata is displayed or searched for. |
Logging single cam media
First, ensure your sequence panel is in cyan logging mode (Secondary-click the top right corner button, select cyan “Log”). To log a clip, find it in the file viewing panel and drag it to the play window. In the logging view of the sequence panel, click into the desired column (the bottom edge of the panel contains a set of text fields ready to appear when clicked upon) – a text cursor appears ready to accept your typing. Begin playing the clip by pressing Insert, or 0 on your numeric pad if you have one (not the zero on the number row above your letters).
With the video playing, type a logging entry at the time of the on-screen event, to end the logging entry press Enter. A log entry may be as short as a single word, or consist of entire paragraphs or lists. Each log entry relates to a span or duration of video, the log entry normally includes up to three seconds of pre-roll before the first character of the log entry was typed. The end point of the log is the time of pressing Enter. If log entries are close together, the three-second pre-roll may be curtailed to join to the preceding entry. A log entry in the list may be dragged onto the record pane as a clip of the length of the log entry. Dragging several log entries onto the record pane will concatenate those logged clips.
If you wish to log sections of video without gaps between entries, instead of pressing Enter to end the log entry, press Shift+Enter instead. This will enable a seamless concatenation of assembled clips when dragged to the record window.
Further, if you wish to have a long log entry in which a lot of text occupies one logging duration (for example, to enter a large amount of dialogue with line-breaks, or text comprising lists, etc.) upon each intended line-break press Control+Enter instead. This will keep you in the current log entry but insert a line-break as a character in the log rather than ending this log entry.
To summarise, logs are saved when you press any of the following:
- Pressing Enter only
…will set the out point of the current log entry. When you start typing again, the time of first character typed (minus three seconds) will become the in point of that following entry. This excludes from the log any sections of irrelevant matter in-between log entries.
- Pressing Shift+Enter
…will set the current timecode as as the out point of the current log entry, as above, but this will also simultaneously become the in point of the subsequent entry. This is useful when you wish to include all material of a source asset across the consecutive log entries with no gaps.
- Pressing Control+Enter
…will set the current timecode as as the out point of the current log entry, as above, and allows a multiple-line log entry. This is useful for when you wish to type in longer passages of information, perhaps with the intention of finding the clip later by text searching.
You can pause playback without ending a log entry by pressing Insert, or 0 on your numeric pad. Restart playback by pressing again. In between those states you could continue adding to a logging entry (while paused).
| If you are logging a playing clip and that clip ends as you are typing a log entry, Blackbird will pause automatically to give you time to catch up. When you press Enter to complete the log entry, Blackbird will begin the playback of the next clip. |
It is also possible to enter logging without the video clip actually playing. Mark the in and out points in the play window, and type the log entry into the desired field of the logging view of the sequence panel.
Under circumstances where you would wish to give an entire clip the same log entry, do not start playback but simply type the log information into the appropriate field of the logging view of the sequence panel. You will receive an alert that the entire clip will be logged with the same information (as ordinarily this may have been done by mistake).
| If you need to split onto a new line within the log text you are entering into a text field, press Ctrl+Enter. |
| Over a slow or unreliable internet connection, Blackbird will queue log entries. The number of unsaved entries is displayed. Be aware that if this continues to be the case after a second or two, what you thought was your internet connection may no longer be – you should investigate whether you are still actually online before proceeding. |

Importing log metadata
As well as logging your own incoming media as described above, you could alternatively import logged media (or just the logs) orginated on other systems. For example, if you have .csv files (or XMPilot files) which contain logging metadata for media you already have on Blackbird, this can be imported into Blackbird and then associated with the media it relates to. The logs contain time information, and as long as those times are also present in the media, they can be efficiently matched up. Simply drag a .csv file from the file panel onto the logging view of the sequence panel, and the logging information will associate with a clip already loaded in the play window.
| A quick way to create a sequence using log entries within Blackbird is to drag entries directly to the record window! |
Editing and viewing logged information
In the log view of the sequence panel, it is possible to edit already logged information, while you view a logged clip in the viewer. To edit the log information, click the relevant column and row in the log view of the sequence panel, and type or edit text as required. In and out points are editable similarly. An easy way to update an in or out point is to position yourself where required using the play panel, and drag the resulting timecode from the play panel onto the relevant column in the log view of the sequence panel. Backspace will delete text in a logging entry – to delete an entry, backspace over all of it and the empty entry will disappear. Words in the log entry are spell-checked and thus may show red underlining. Click to edit, or if you wish, Secondary-click (or Option+click/Alt+click) to add it to your dictionary (for example, specialised words or trade names).
It is also possible to approach log viewing from the other direction, as it were. From a log entry, if you wish to view that point in time, drag the timecode from the relevant column in the log view of the sequence panel, over to the play window running that clip. The view will take up from that time.
| Another quick short-cut to achieve the same result is to double-click a timecode. It will jump the player straight to that frame. |
| If you Secondary-click drag a log entry timecode or text field entry over to a blank area of the Blackbird workspace, a new player will materialise showing that clip cued up to that log entry’s in time. With more than one player on the workspace, both will sprout a selectable cyan tab on their left-hand edge. |
| It is possible to Secondary-click on a media clip to select the menu entry , which will open the clip in a player panel plus a log view of a sequence panel (in addition to what may already be in the workspace). |
Printing or exporting logs
Printing a log on sheets of paper is often useful (indeed, logging was originally performed using a “log sheet” – writing down timecodes shown from the play deck, along with brief notes regarding the content of the media at those points). What actually happens when you print a log is that Blackbird exports a .csv file of the logging and holds it open in a browser window from where you print it out. Equally, it could export just a plain .csv file of the logging, if that is more useful to you.
The Export button will send the logging data as the tabular arrangement you see, to a browser tab for printing. If you don’t particularly need to print or even see the displayed logging data but only need a quick download of the .csv file, Secondary-click the Export button and it will (via the browser tab) send a download, from where you can select whether to download it to a folder or open it in an app on your computer (such as a spreadsheet or a text editor).
| CSV files are readily importable into any spreadsheet program, also as they are only text files they may be opened and edited in almost any basic text editor (if saved back out in the .csv format, not a word-processor’s own format). Any column with no entries in it will still have the commas to separate the (blank) values, as a comma in a CSV file denotes successive columns – each row has the same amount of commas as there are columns separations. This is one of the main reasons they are called “Comma Separated Values” files. |
| When exporting, duplicated rows may be merged with Options button menu menu item, in the logging view of the sequence panel. |