There are several situations where a shoot or capture would be executed with several cameras at the same time, but with (hopefully) differing viewpoints or angles of view. One is where a subject requires several shot angles or distances, as for example a modern interview will require. If the possibility exists to run several cameras at once, a long shot of the group, plus a close shot of each of the participants is usual. In cases where only one camera was possible, this effect can be “faked” using another set of takes after the interview to provide “noddies” and the like.
Another situation in which multiple simultaneous cameras are beneficial is that of an event which may take place across several positions or rooms, or an event that is also being witnessed by others in different rooms or locations. Keeping them all in sync (as well as having the audio make sense) is regarded as a key ingredient to the success of a multicam shoot. Consequently, clear and unambiguous naming of assets as they come in will prove to be of highest importance later on.
Creating multicam clips
Given a folder of many media clips concurrently shot on several cameras, you can pick relevant (audio and video) clips and select the entry (not the entry). This results in a “default” multi-camera set.
The several clips within folders which you select will have timecodes which correspond to each other.
Multiple-select the group of files you desire, (Shift+click up to a maximum of 18 sources.
Secondary-click (or Option+click/Alt+click) the selected highlighted clips.
A contextual menu appears, select the entry .
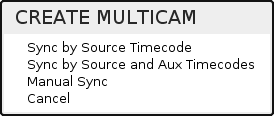
On selecting Create Multicam you are asked whether to sync by source timecode; source plus aux timecodes (which is where a timecode is added to a clip that had no or a different timecode) or whether to manually sync. If the clips have no timecode at all, they could be synced manually into a multicam group and then their time relationship to each other adjusted afterwards.
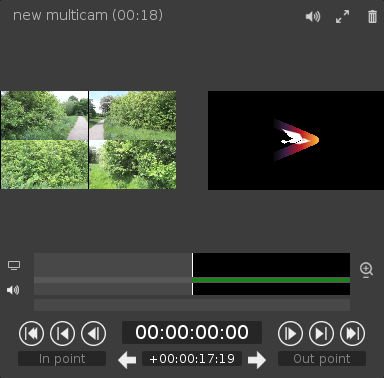
A new multicam clip will appear at the same level as your selected material, which contains all which you had selected. Note the multicam symbol in the top right corner of the clip icon. The name will initially be “new multicam”, you will be prompted to rename it at this point. When the clip has been renamed this is also reflected in the name appearing in the top left of the multiviewer.
The viewing size of the multiviewer is stepped up to the next size up (which for the purposes of this manual makes it easier to see).

Here, we are adjusting the sync relationships of the multicam clips. Secondary-click one of the multi
viewer sources and select Sync Multicam.
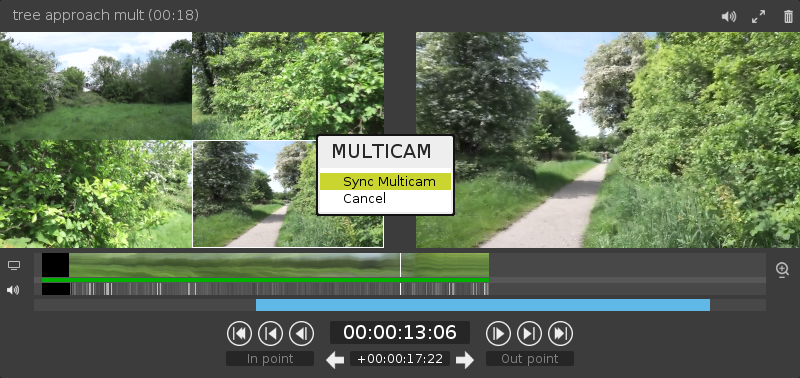
This will give you another (similar, not quite the same) multiviewer player for multicam sources, and also a timeline view of the set of Video Waveforms.
The Video Waveform display bars may be grabbed and slipped back or forth against the others, to alter the time relationship of individual clips within a multicam group.
Viewing multicam clips
Given a folder of many media clips concurrently shot on several cameras, you can pick relevant (audio and video) clips and select the entry (not the entry). This results in a “default” multi-camera set.
The several clips within folders which you select will have timecodes which correspond to each other.
Multiple-select the group of files you desire, (Shift+click up to a maximum of 18 sources.
Secondary-click (or Option+click/Alt+click) the selected highlighted clips.
A contextual menu appears, select the entry .
On selecting |
A new multicam clip will appear at the same level as your selected material, which contains all which you had selected. Note the multicam symbol in the top right corner of the clip icon. The name will initially be “new multicam”, you will be prompted to rename it at this point. When the clip has been renamed this is also reflected in the name appearing in the top left of the multiviewer.
The viewing size of the multiviewer is stepped up to the next size up (which for the purposes of this manual makes it easier to see).
Here, we are adjusting the sync relationships of the multicam clips. Secondary-click one of the multi
viewer sources and select Sync Multicam.
This will give you another (similar, not quite the same) multiviewer player for multicam sources, and also a timeline view of the set of Video Waveforms.
The Video Waveform display bars may be grabbed and slipped back or forth against the others, to alter the time relationship of individual clips within a multicam group.
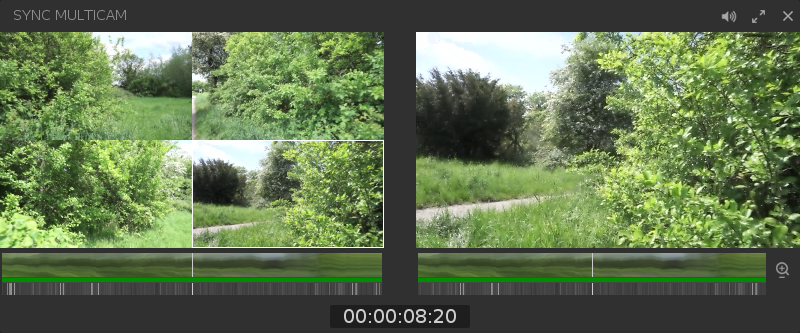
Dragging the multicam clip onto the play panel will open a new play panel displaying all of the clip or cameras sources as a multi-view arrangement to the left, and the selected source on the right.
The Video Waveform spanning beneath both the sources and the selected displays is much the same as on a single cam clip, and only relates to the selected display.
Clicking on a clip within the multicam view on the multi-viewer on the left side of the player panel will start it playing and show it on the right side of the player panel.
Clicking on a different clip within the multicam view on the left side will switch the selection of the player on the right side. This is the choice which will go through to the recording destination in the case of editing. In the meanwhile, all other clips in the same multicam view remain sync locked all the way through, as expected.
The navigation buttons (play forward/back; frame forward/back; start and end) and the timecode displays (current position, in and out selections) are the same as on a single cam player.
Directly clicking on a chosen cam source within the multicam side’s multi-viewer is quick and easy, but there is another way.
To quickly select clips from the multicam multi-viewer, where the number of clips is less than nine.
First select the whole player panel itself (which holds the multi-viewer of the multicam sources)
Then use the number key row along the top of the keyboard (not the function keys, the actual numerals)
Each of the multicam sources corresponds with a number key (ordered across, then down, on the multi-viewer). This is actually a faster method in situations where you find yourself rapidly cutting back and forth between the same two or three views – for example, an interview.
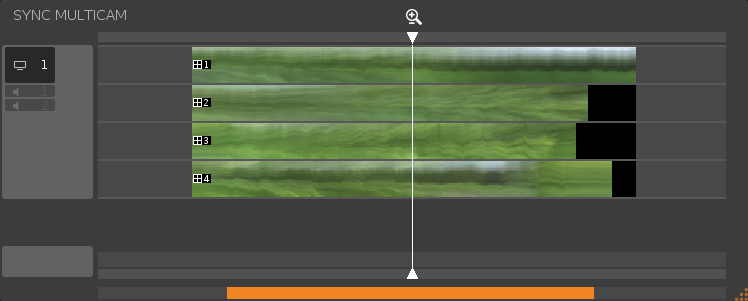
For multi-cam media which does not have a timecode, it is feasible to align cameras “manually”. Secondary-click (or Option+click/Alt+click) on any of the camera windows within the multi-viewer for a menu, choose for a Sync Multicam window.
In this, you can drag tracks on a timeline display so that they sync – either by audio cue or visual cue. Typically a producer will have shot the session pre-rolling with a “sync clap” (at mimimum, simply a clap of hands within shot of all cams) – the sharp audio pulse is used to pin various clips together in register.
Within the multicam player, Secondary-click the audio monitor button for the multicam configuration menu (this is the one to the left of the Video Waveform, not the main volume control of the player up on the top). This allows you to specify which audio tracks are to be heard, and whether switched, with which camera.
If your internet bandwidth is suffering, and you wish to accommodate more than ten multicam sources, then playing should be set to lower frame rates than normal for smooth operation. It is possible to set the camera views to play at full, half, quarter frame rates. An account manager can set up this configuration.
Logging multicam clips
Dragging the multicam clip onto the play panel will open a new play panel displaying all of the clip or cameras sources as a multi-view arrangement to the left, and the selected source on the right.
The Video Waveform spanning beneath both the sources and the selected displays is much the same as on a single cam clip, and only relates to the selected display.
Clicking on a clip within the multicam view on the multi-viewer on the left side of the player panel will start it playing and show it on the right side of the player panel.
Clicking on a different clip within the multicam view on the left side will switch the selection of the player on the right side. This is the choice which will go through to the recording destination in the case of editing. In the meanwhile, all other clips in the same multicam view remain sync locked all the way through, as expected.
The navigation buttons (play forward/back; frame forward/back; start and end) and the timecode displays (current position, in and out selections) are the same as on a single cam player.
Directly clicking on a chosen cam source within the multicam side’s multi-viewer is quick and easy, but there is another way. To quickly select clips from the multicam multi-viewer, where the number of clips is less than nine.
|
| For multi-cam media which does not have a timecode, it is feasible to align cameras “manually”. Secondary-click (or Option+click/Alt+click) on any of the camera windows within the multi-viewer for a menu, choose for a Sync Multicam window. In this, you can drag tracks on a timeline display so that they sync – either by audio cue or visual cue. Typically a producer will have shot the session pre-rolling with a “sync clap” (at mimimum, simply a clap of hands within shot of all cams) – the sharp audio pulse is used to pin various clips together in register. |
Within the multicam player, Secondary-click the audio monitor button for the multicam configuration menu (this is the one to the left of the Video Waveform, not the main volume control of the player up on the top). This allows you to specify which audio tracks are to be heard, and whether switched, with which camera.
| If your internet bandwidth is suffering, and you wish to accommodate more than ten multicam sources, then playing should be set to lower frame rates than normal for smooth operation. It is possible to set the camera views to play at full, half, quarter frame rates. An account manager can set up this configuration. |
With single camera clips, added log information pertains to that camera (as would be expected). With multicam clips, the log information may or may not relate to the selected camera in view on the right of the player.
It is possible to log to a different camera than the selected camera. Hold Control down as you press the associated camera number (1-9), log entries will now be associated with that camera source.
If you later wish to edit which camera source relates to which log entry, this is possible with Secondary-click on the camera number in the camera column of your log view in the sequence panel. You can also edit it to “Multicam or All cameras” from here. In each case the original source clips will also receive the entered log information, according to selection.
Autosync of multiple simultaneous assets
With single camera clips, added log information pertains to that camera (as would be expected). With multicam clips, the log information may or may not relate to the selected camera in view on the right of the player.
It is possible to log to a different camera than the selected camera. Hold Control down as you press the associated camera number (1-9), log entries will now be associated with that camera source.
If you later wish to edit which camera source relates to which log entry, this is possible with Secondary-click on the camera number in the camera column of your log view in the sequence panel. You can also edit it to “Multicam or All cameras” from here. In each case the original source clips will also receive the entered log information, according to selection.
“Autosync” gives more flexibility in creating a multicam set.
With media clips captured within the same time period, for example, a multiple-camera shoot, it is often possible to “autosync” them together, synchronising them automatically for you. When you Secondary-click (or Option+click/Alt+click) on a folder of such simultaneously shot items, you see a item, which when selected will ask “multitrack” or “multicam”.
“Multiclip” gives a separate “sync clip” per source clip. Given some content not shot simultaneously, or out of time, but there is continuous audio available (for example from an audio recorder), “Multiclip” will sync whatever audio is in each clip synchronised to the continuous audio which they all match up to in common.
“Multitrack” is appropriate if the media in the folder is a concurrent shoot where different cameras were running simultaneously, “Multitrack” will result in a sequence with each camera on a separate track. “Multitrack” asks you to name a sequence.
“Multicam” provides a sequence with one track, where all the cameras are within a multi-camera group (together with the special player – a multi-view of all the sources on the left, and the selected one on the right).
“Move sources to folder” will tidy up relevant clips into a folder with a name you may specify.
It is possible to select a range of tracks of external audio you wish to keep. If guide audio is present, you may keep or reject any of the tracks.
“Collapse video” and “collapse audio” options can create timelines with up to 12 video tracks and up to 36 audio tracks. If exceeded, Blackbird will try to rearrange items on tracks to fit into timeline gaps.

“Use aux timecode” allows use of material with no timecode, by letting you assign your own timecode to it (this will be an “aux” timecode), to use as a timing reference.