What is AAF
AAF stands for Advanced Authoring Format, a format originally conceived and hosted by the Advanced Authoring Format (AAF) Association, and now handled by the Advanced Media Workflow Association (AMWA). Effectively we could think of an AAF file as a kind of EDL (Edit Decision List) which in theory contains nothing more than instructions, times and file references. Of course it can often be more complex – however as a way of thinking about an AAF file, this comparison suffices.
The Act of Publishing
In Blackbird, you publish by dragging a source or edited clip to the toolbar onto an AAF publishing “pre-set button”, whereupon an AAF asset is published to a url. The button needs to have initially been “pre-set” in the Blackbird Control Centre with any account-specific information. The resulting downloaded AAF represents production edits that have been applied to the source clip(s) while in the Blackbird Forte video editing environment.
Round-tripping
It is often the case that media comes from camera sources directly into an existing Avid Media Composer environment in an existing production suite. Clips make their way to the Blackbird platform via an Edge Server, which ingests to Blackbird Proxy on the Blackbird Cloud. Editing work is performed upon source clips within Blackbird Forte, the result exportable as an AAF for importing into Avid Media Composer as an edit timeline. The AAF which left Blackbird and which is now in Avid is re-associated with the original clips.
This workflow often proves more economical and less time-consuming than using the Avid environment itself for that same work. The AAF produced by Blackbird will associate with Avid Media Composer (and Adobe Premiere) in most circumstances. However, there are considerations which require attention to produce a satisfactory round-trip.
Automatic re-linking with Avid Media Composer
The linking of the resulting Blackbird AAF can be made to be automatic with a small amount of forethought and preparation each time.
The process of automatically relinking involves:
Accepting camera files into Avid Media Composer for ingest there;
Letting Blackbird ingest the result into the Blackbird cloud;
Exporting an Avid EDL to Blackbird (which references the Avid essense files);
Performing edits or production work in Blackbird Forte or Ascent;
Publishing an EDL in the form of a representative AAF from Blackbird back into Avid;
Setting Avid to automatically find the corresponding Avid essense files to allow Avid to display the result of the production or editing work.
After the Avid project has been set up (see Basic guide to Avid Media Composer prep) and the Blackbird watch folder has content (from Avid), we have choices as to whether we wish to perform a manual or an automatic relink of our value-added production work in Blackbird® when we take the work back to Avid. First we describe the automatic procedure.
Consolidating linked files to a Blackbird watch folder
Blackbird® is to be set up from the Edge Server for watching a watch-folder. This will typically be what Avid sees as a destination store, into which new linked files are consolidated or transcoded.
After consolidating onto a destination store, the consolidated result may be used by the Avid workstation (or other Avid workstations) and the original volume with the camera files we just imported can be unmounted and removed if desired.
| INFO | As far as the file system is concerned, the original assets will still reside in their original folder (wherever that was). |
Avid will create an Avid Mediafiles folder, in which all of the tracks of the original content are split up during transcoding and then stored. The MXF files are MXF OP-Atom type, which is what Avid itself uses at the editing level. These are separate files for each audio and video channel (or other data types), tied together by common metadata (and file naming structures).
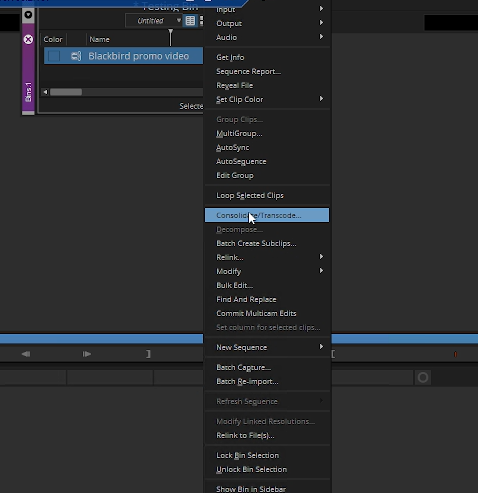
Avid’s Consolidate/Transcode pane
On the selected file(s), Secondary-click to reveal a contextual menu with a Consolidate/Transcode… entry.

This will show Avid’s Consolidate/Transcode pane. In the top left corner, we are setting Consolidate to active. In this case, no conversions are necessary.
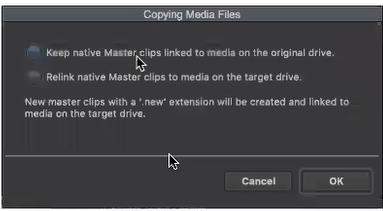
Pressing the Consolidate button will pop up a choice. We will keep native Master clips linked to media on the original drive, here.
A progress bar shows the consolidation process (also seen as a group of temporary files inside the folder .
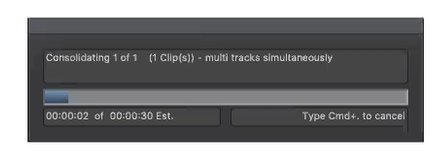
When the temporary files in the Creating folder disappear, they will have become MXF OP-Atom files, one per media track or channel.
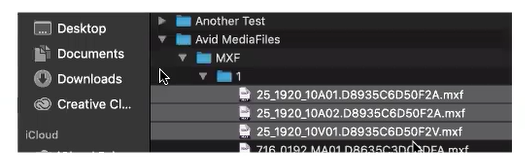
Here we see only one video and two separate audio files (ending “V”; “A” and “A”) as we only consolidated one original source clip in this example.
Moving the Atoms to shared storage
At this stage, it is a common procedure to also move the atoms to shared storage. The Blackbird Edge Server will have already been set to watch that particular location. Viewing the progress in the Edge Server Expert panel will show the progress, as well as the set destination for Blackbird proxy in your Blackbird account.

Here in the Blackbird Edge Server’s Expert GUI interface, you see the Folder column for the selected row (the row in question is the example we refer to here) the entry is set to Avid/25/bypath – the latter ensures that the same path name is given to the result in Blackbird.

In the Edge Server Expert pane, ensure that the Kind column indicates avid rather than avid-v, as the latter may seek a separate audio file in Blackbird, despite the the Blackbird proxy video file having correctly re-combined audio in it already!
Creating a dummy sequence to transport the clip metadata
At this juncture we perform a simple but necessary action to ensure we take all of the clip metadata (including new bin metadata) forward into Blackbird.
In the Avid bin we make a new sequence with the contextual menu entry New Sequence.


Give this new empty sequence a meaningful name for you to recognise later.

Dragging master clips to new timeline
Drag all of the master clips generated from transcoding or consolidating (physical clips, not linked clips) onto the timeline of this new sequence.

| It doesn’t matter where on the timeline. |

This ensures that the newly-created sequence now contains all of the metadata of all of the master clips you have put on it. Information about the AMA plugins, codecs, colourspace information, camera rotation angles, etc. are now recorded in that new populated sequence.
Exporting AAF with metadata from Avid
With the sequence selected, in the main Avid menu go to

…or Secondary-click (or Option+click/Alt+click) on the sequence itself to produce the contextual menu, then from there.

Using the Options button on the file save dialogue box, ensure that the Export Settings are set to Link To Audio And Video with the Export Method menu set to not export any physical media: .

Also, turn off Render Video Effects if it is not already off.
In the Audio Details tab of the same pane, turn off all options (from Include Rendered Audio Effects and Render All Audio Effects, down to all the Convert Audio … options – turn them all off)
Once we press Save (and in the export dialogue box, Save again) we produce an AAF file effectively containing no more than the master clip metadata.
The resulting AAF file will be exported to wherever you saved it to (for example, the Desktop).
Importing AAF with metadata to Blackbird
In Blackbird’s Control Centre, as an “account manager” role, press the Upload button on your account.

Locate the AAF file with the Choose files button.
| NOTE | Don’t worry about the Ingest Format settings above that button, leave it on whichever choice it defaults to (the choice is irrelevant in this case). |
In this example, we left it on the Desktop.

The Upload file button uploads it.
Production work in Blackbird
In Blackbird, work such as logging; sync pulling; sync mapping, will now retain the reference to each master clip (which refers to the original metadata), thanks to this imported AAF. In this example, the referenced clip can be opened into Forte.
An example edit

An in-point is set.

An out-point is set.

Two such selections are cut together, as a crude example of an edit.

Saving the EDL of your production work
When your production editing in Blackbird is complete, save a Blackbird EDL of it.

Rename the EDL file to a meaningful name (to recognise back in the Avid system).

Publishing an AAF of the EDL
In the left-hand side Toolbar will be a cyan-coloured publishing button with a logo typically indicating AAF.
Drag your freshly-saved EDL file over to the left-hand side Toolbar button for AAF Export.

Clicking to open the AAF publishing button will show a folder which contains the AAF.

Clicking on the AAF will then open a web page with the details of the resulting AAF, including a download link for it in the top middle right-hand side, headed “Download”.

Here it is, downloaded to our Mac.


Bringing the Blackbird AAF into Avid
Once downloaded, the AAF is able to be dragged into the Avid bin to import it.


The imported AAF now represents the production editing work performed in Blackbird, and fully relinks with all the original media in the expected manner. Here is a quick test to show the edit we performed in Blackbird, now round-tripped back into Avid.


Manual re-linking to Avid Media Composer
The process of manually relinking involves:
Accepting camera files into Avid Media Composer for ingest there;
Letting Blackbird ingest the result into the Blackbird cloud;
Performing edits or production work in Blackbird Forte or Ascent;
Publishing a “dummy” representative AAF from Blackbird to bring back into Avid;
Manually locating the corresponding Avid essense files to allow Avid to display the result of the production or editing work.


At this point we consider that the Avid project is created and set up, files have been accepted into Avid and bins are established (see Basic guide to Avid Media Composer prep). Also, after any further metadata added (see Reel name and number metadata).

The Blackbird watch folder will have already been set to watch the Avid bin and will have already ingested the corresponding media into the counterpart proxies on the Blackbird cloud.

Looking at the Blackbird ingested media (either by the Control Panel, or from within Forte by opening the corresponding folder) we see the corresponding video rushes presented in a manner which allows editing and other production work to take place.

However, in the manual relink process, we do not have an exported AAF EDL from Avid at all.
An example edit

In this example we perform a very simple demo edit – a cut between two clips which Blackbird has ingested from the same volume that Avid transcoded the original files to.
Set in and out points


We set the in point and out point of one clip, then drop the selection on the timeline.


We set the in and out of another clip and drop that selection on the timeline too.
Trim or adjust the edit


If we wish we could re-trim the in point, the out point of each clip, and the in+out point of the cut between the two clips (just to verify that we end up with the same edit when we shortly relink our work, back in Avid).
Save the EDL


Once we are relatively satisfied, we click on the EDL save button on the record window (the button shaped like an anachronistic floppy disk) and rename our new untitled EDL to something more meaningful.
Publish the EDL as an AAF

We then drag that freshly saved EDL of our edit all the way over to the left Toolbar in which we see a cyan publishing button representing AAF export.

Dropping the EDL on this will open a new window containing the AAF.
The resulting AAF in this case is actually only a dummy AAF, it does not refer to the actual working essense files on the Avid. The edit is represented by references to the presence of an equivalent amount of audio and video tracks, their timing and lengths, including the in/out points and the edit on the timeline. The media tracks themselves will be dummy tracks, in which only the timing is important.
Accessing the published AAF

Opening the AAF in the folder from inside Forte will display a new browser page containing a link to the AAF.

Clicking this link displays a file selector dialogue box asking you where to save the AAF.

In the bottom left corner of the browser window you may open it directly or “Show in Finder” to access it that way.
Bringing the AAF into Avid
It is important to remember, when performing a manual relink such as this, that this AAF does not reference the original files (the transcoded or consolidated ones) in Avid. All it contains is references to what are now dummy clips which have exactly the same lengths as the original Avid files.
Now that production effort has been added in Blackbird, the AAF also contains edit information such as in and out points for clips, and edits on the timeline. Those are not in Avid yet until we bring the AAF into Avid. When we do bring the AAF into Avid, there will be edit information, but not associated with any media that Avid knows about – in other words, still referencing dummy clips. What we have to do now is associate the dummy clips that the AAF refers to, to the the real clips that Avid knows about. Once that is achieved, Avid will have the edit or production work, applied to the transcoded or consolidated Avid files. The relink process is fairly simple.

This is our Avid bin with the (in this case) transcoded files and links to the original camera files. We also have the window open (top right) which contains the Blackbird published AAF of the edit. We drag the Blackbird AAF onto the Avid bin.

You will see this dialogue warning: Encountered exception 'Failed to import a clip' Do not worry – we expect this, all is well. Simply press Yes and continue. The scary warning was because Avid is importing an AAF which appears to be linked to only dummy media (in other words, the intended media is offline), yet that is exactly what we intend to do at this step.
The dummy clip in Avid appears offline

Now that it has the new sequence, it generates the corresponding dummy clips which the sequence mentions. Although they seem to have related names to our originally ingested clips, they are not linked and are not seen by Avid as being related (yet). The important thing is that the start times and the length of clips are identical to the originals.
The Avid transcoded (or consolidated) clips here are now renamed to
Manual Relink 1.new.01andManual Relink 2.new.01with the source path of/Volumes/Avid/Manual RelinkThe newly created dummy clips (referenced in the Blackbird AAF) are
Manual Relink 1andManual Relink 2with the source path ofAvid/Manual Relinkbut having no mention of/Volumes(this is how you can tell they are dummy clips)The ones at the bottom,
Manual Relink 1andManual Relink 2with the source path of/Volumes/Avid/Manual Relinkand with the icon of a chain link on the frame are your original camera files (as links).
The extra demo metadata we assigned to the original Avid transcoded files is also present in the corresponding Blackbird dummy clips (the My metadata column values). |

The timeline in Avid is red (indicating the media is offline) but the actual timeline production edit itself is the same as it was in Blackbird. The in and out points, the timing of cuts and other production work all correspond.
Time to tidy up our Avid project
Before we continue, we now have more than one instance of each file, with similar names applied in each case. It would perhaps be safer at this juncture to trim out what we do not need.

Delete the camera master clips from the bin (we are only deleting the link reference – the actual files themselves may stay where they are, or perhaps be moved off to an archive).
Link the production work to the media

Select the newly imported Blackbird AAF and use the contextual menu item Relink….

From this dialogue box, there are two menus that should be specifically set to the following menu items:

Choose the second menu item Tape Name or Source File Name.

Choose the second menu item Any HD video format. This is safer, in case the project settings differ from the original camera files, and assuming you are working only in HD. In this example here, for example, we started off with camera files shot as 50i, but transcoded to 25p. If we left it on the first option the files would not relink properly.

As we see here, we have successfully relinked the Blackbird production edit work to the originating Avid transcoded media. The timeline is no longer red indicating media offline, but the expected colours for normal media which can be found.
Tidy up after successful relink
As before, it is often a good idea to tidy up the project before continuing, to alleviate potential for confusion among similarly-named files and resources.


Edit and relink, compared
As you can see, we have the same edit points as the published AAF of Blackbird production work.

The end of the edit, created in Blackbird.

The end of the edit, relinked in Avid.

The jump cut, in Blackbird.

The jump cut, in Avid.
Appendix A: Basic guide to Avid Media Composer prep
This section is a helpful guide to Avid Media Composer preparation, for either manual or auto relink.
The first step in using Avid Media Composer is usually to create a project.

At the point of naming the project the choice of frame size and framerate is made.

This creates a default bin, into which one may import content.

In the new bin, there is a useful info tab, which lists (among other things) the AMA plug-ins currently active in your Media Composer installation.

| It is highly beneficial to ensure you use the same version of Media Composer and all utilised AMA plugins in the ingest as the version you use in the Media Composer edit. |
An example Avid ingest
From a bin, Secondary-click (or Option+click/Alt+click) to obtain the contextual menu entry

The Source Browser interface, when you have found your way to the desired media, shows you some important columns to observe.
| The contextual menu entry will use the operating system file selector dialogue box - try to avoid using this way, as there will be less analysis of metadata at the point of selecting the files, which may prove a disadvantage later. |
The column titled Plug-in displays which plugin will be used to handle the media – either using Autodetect or a specifically loaded AMA plug-in for your media. At this point you could discover that your media has no associated plugin to import it correctly.
Similarly the Colour Space profile may require attention – media shot using the camera’s Log or Flat shooting profile may have not been correctly detected as logarithmic. If necessary that choice could be forced through a contextual menu, although you are unlikely to need this in an established workflow.

| It is always worth casting an eye over these columns at this stage to assure yourself, as many such decisions have to be made at this stage. |
At this point you select a bin, or elect to create a new bin which will take the name of the folder of the media you are bringing in.

The assets are now linked into the bin – they are not actually “in” the bin (yet), at this stage they must still exist in the location you brought them in from (for now).
The process of adding custom metadata
Once the linked data is in the bin, you may select which metadata to view (there are a great many other columns to make use of should you need).

At this stage we could, if we wished to, add custom metadata. Use the contextual menu to “Add Custom Column”, then give a meaningful name to the column.


Then add an actual data value (again, some meaningful text) into that column on a clip. Copy it to quickly paste it into other rows of that column.


The important aspect is that when the clips are transcoded or consolidated, they will take this new metadata with them.

Metadata entered here in this manner is considered “bin metadata", unlike “structural metadata” which came in with the file and might consist of frame-rate, frame-size, clip-duration, timecode, etc.

Adding reel, reel number metadata
Having copied and pasted your new made-up bin metadata value into all the other clips you have just imported the links to (or at least, those clips you intend to use), you perhaps would use the existing Reel and Reel number columns to give your assets such reel names and numbers.


This helps to disambiguate similarly named files from similar cameras when more than one of the same type of camera is used in a shoot. Otherwise they may well start numbering their files similarly and it becomes harder to untangle which file was from which cam as time goes on.
Appendix B: Appendix
Reel name and number metadata
Within Avid Media Composer and within Blackbird® it is possible to set and maintain reel name and reel number metadata, keeping them intact through the trip from Avid to Blackbird and back again. One immediate use for this metadata is to account for several (perhaps similar) cameras in a multi-cam shoot producing similar or identical file names.
Accepting consecutive batches of files from more than one camera giving the same filenames stands the risk of overwriting each other. Most production teams adopt a consistent methodology to account for this, such as creating specific folders per camera (where cameras are often named in some distinctive way) and then copying the camera files into their own folder. Once they are ingested, however, the filenames are still similar (although treated as distinct resources) and thus it can still be a source of accidental confusion. Using folder names as Avid bins is one solution. Using reel name and reel number metadata keys is another, more established, methodology in the industry. In the days of film, the reel names would be common across a production shoot, and the reel numbers refer to the actual physical reel of film (where it would be typical to have more than one reel in a complex shoot). Similarly, disk label is another metadata key offering a similar benefit.
Entering the reel name or disk label in Avid at the start of the setup will ensure that this metadata travels all the way through the Blackbird production work too.
| The important thing to bear in mind if you use any of these naming metadata methods is that the naming must be accomplished at the beginning of your workflow – essentially, as soon as the files come in and before any consolidation or transcoding. If you attempt to name or rename later in the process you risk not being able to match up or relink assets. |
Blackbird® watch folders
A Blackbird Edge Server can be set to watch a folder on either the same machine or another volume – perhaps another machine or a NAS, or any shared network volume seen by Avid as a destination store. As new files appear in this watched folder, Blackbird will have been ingesting to the cloud in the background. If set this way, the result is a situation where Avid knows about the project’s working files (and perhaps references to original files). Meanwhile, Blackbird has working proxy of the same files. Production work such as editing may be efficiently carried out on the Blackbird assets. This work must in some way be brought back into Avid in such a manner that allows relinking of the Blackbird reference to Blackbird proxy in the Blackbird cloud, back instead to Avid’s reference to the corresponding Avid working files. This process is called relinking and is the subject of this document.
Log / Flat profile workflows
Using Log profiles (such as Sony’s SLog) when round-tripping via a relinked AAF from Blackbird, any Log or Flat profile characteristics are unaffected. There is no profile change while actually editing in Blackbird Forte.